This is a true show-stopper, and I don’t ever recommend making it unless you have a lot of time and money on your hands and aren’t going to fuck it up in the slightest way. It’s a classic restaurant dish, since it combines so many distinct ingredients into one small dish, it’s not really practical to do it at home, let alone on a weeknight. I have made this once outside the restaurant, and it brought down the house, so if you find yourself in a situation where you have to cook for a small party and want to blow people away, set aside some cash and a few hours and this will do the trick. It is visually, tactilely, and gustatorily at the pinnacle of the dining experience, and if I salute those who designed it. It is also at the height of restaurant logic, since it utilizes all parts of a tuna steak, each to its strengths. I will explain this in more detail below, but for this reason, it is also impossible to cook in small quantities: in order to create the sections that are seared, you’re only cutting away a small section near the belly, so to get enough, you need a large piece of tuna. Lastly, I respect this dish because it seems like the ultimate summation of No. 9 Park’s principle culinary preoccupations and influences: French technique (the mise-en-place to assemble the dish), Italian, or at least Mediterranean, flavors in the pairing of tuna with fennel, olives, and tomatoes, and a small but significant nod towards Japan (raw tuna, architectural presentation). This dish really has no place in this collection, since it is so solidly someone else’s, but this is a compendium of things I know best in the kitchen, so this definitely applies. As with the beet salad, if you’re from the restaurant and want me to take this down, write to me and depending on who you are I’ll either acquiesce or ignore you.
It goes without saying that no length is too great to which to go in order to obtain the highest quality tuna for this dish, since you’re serving it raw, and the entire effort would go to waste if you procure anything less than astonishing. The tuna that came in to No. 9 Park, of course, was beyond compare, and the one time I did this outside the restaurant, I bought a chunk at Citarella that glowed. Don’t waste your time if you can’t get something that makes your jaw drop when it’s in the fish market.
There are four distinct elements to this dish: the seared tuna, the tuna tartare, the confit of fennel, and the fried tomato skin garnish. You must make everything in advance and either chill it or hold it at room temperature, but it’s not something that can be done a day ahead – prep your various items, chill them, and try not to hold them for more than an hour or two.
Ingredients:
For the fennel:
- 2 bulbs fennel
- 2 cups olive oil
- 4 cloves garlic
- 1 bunch fresh thyme
- Zest of ½ lemon
- Salt and pepper
For the seared tuna:
- 2 logs of tuna belly, cut from 1 3-lb side of tuna (see below)
- ¼ cup of finely chopped olive tapenade
- Salt and pepper
- 1 TBS olive oil
- 1 TBS safflower oil
For the tuna tartare:
- The rest of the 3-lb chunk of tuna
- 1/3 cup olive oil
- ¼ cup finely minced chives
- 2 TBS fresh lemon juice
- Salt and pepper
For the tomato skins:
- 2 tomatoes
- ¼ cup olive oil
- Salt
Directions:
Start by preparing the fennel confit, since this needs to cook for about 90 minutes. Preheat the oven to 250, then prepare the fennel bulbs by removing the stalks and a very thin slice from the bottom (you want to keep it held together but get rid of the very end that has touched everything along the way from the field to your kitchen). Wash the bulb very well and then slice into ¼ –inch slabs. Place these in one layer in a shallow baking dish, sprinkle with salt and pepper, then completely submerge in olive oil. You may need more or less, depending on the size of your dish. Smash and peel the garlic cloves, then add them along with the lemon zest and thyme, pushing gently on them to submerge. Place in the oven and cook for about 90 minutes, until the fennel slices offer no resistance at all to the tine of a fork.
When the fennel is finished, remove from the oil and drain on a paper towel. This is one element that actually can be made a day or two in advance, but if you place it in the fridge, be sure to remove and bring to room temperature well in advance of serving, since olive oil in the fridge tends to clump up in unattractive yellowish-green curds. You don’t want this to be dripping in olive oil when you put it on the plate, so try to drain it well. Be careful when handling them, since they will be so tender that they will rip easily. You may save the oil for another use, or discard.
Next, it’s time to break down the tuna. This is a bit difficult to describe, so I’ve included some pictures as diagrams, since it’s crucial that you get this right. Essentially, the side of tuna is streaked with white cartilage that generally goes away when it’s cooked but is tough and no good at all when raw. That is one reason that sushi slices are so thin – and also has to do with the direction that it cut, so each piece of sushi will contain only cross sections of this cartilage and not contain the full horizontal cut. Towards one corner of the side, there will be very little of this cartilage, and what is there will be very thin, whereas along the outer edges towards the skin, there is much more cartilage and it is tougher. The inside part with less cartilage is close to the belly, and that is one reason why toro is so prized – that, and also that it is lightly veined with delicious tuna fat.
Our goal is to remove the toro section to use it for the seared tuna, and then to use the rest for tartare, after removing the cartilage. The latter may sound like the difficult part, but it’s actually quite simple, and the harder part is getting the cut right. You want to break this down with the tuna on its side, but for demonstration purposes, I’m going to utilize a steak, which is like a cross-section. That is to say, if we imagine the side of tuna as a cylinder, it lies on its side and the two faces on either end are the steaks (figure 1).
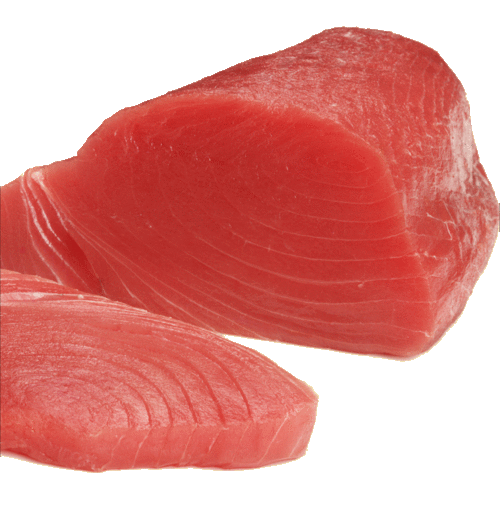
Figure 1
Take a look at the steak in figure 2, below. Essentially, you want to make two smooth cuts where the two solid lines are, removing a rectangular log. Use a very sharp knife (if you’re not, immediately stop reading and go here) and don’t make multiple slices in the same area, or you’ll fray the edges of what is meant to be something pristine. After you’ve removed this section, you should have two pieces which look roughly like the ones in figure 3 – you can see the low cartilage piece on the right and the high cartilage piece on the left. Once you’ve removed the log in one big chunk, cut it into two equally sized logs by slicing along the dotted line. Once you’re finished you should have two logs which are, at a rough guess, 1½ inches by 1½ inches by about 5 inches.
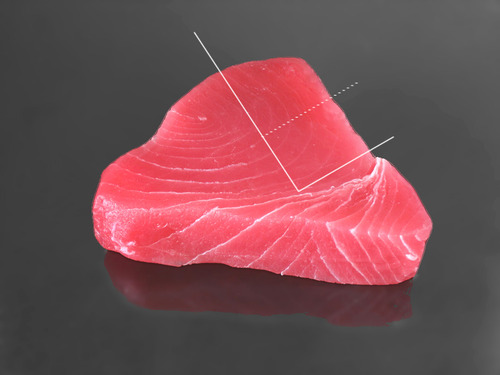
Figure 2
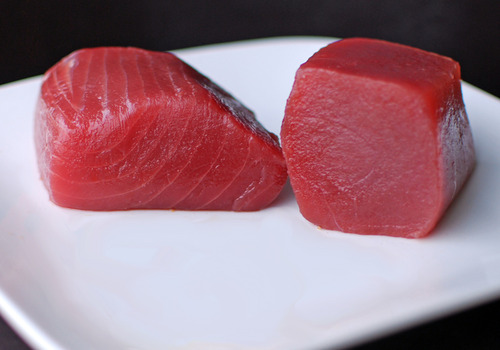
Figure 3
Put the rest of the tuna in the fridge for the time being – we’ll come back to it in a second. In a medium size bowl, place the tapenade (it’s ok to use jarred tapenade – just make sure it’s very finely minced olives that work like a paste and has no big chunks), the salt and pepper, and the TBS of olive oil and stir to combine. If your tapenade is super oily, don’t add the extra olive oil – you want it to be somewhat sticky so it coats things evenly. Add the two logs of tuna, tossing to coat evenly. Remove and let the excess remain in the bowl. They should be very evenly coated – not too thick and not to thin. The tuna itself should not be completely obscured by tapenade, but there should be no under-exposed area. Just slather it on good and thick, then shake/drip the excess off.
You’re going to sear these next, and you have to do a superlative job. You want to use a stove with very even heat, a top-quality, thick-bottomed pan, and one that doesn’t have hot spots or pits from years of use. Don’t use a non-stick for this; I used to use small, lightly seasoned cast irons that were reserved specifically for searing fish. You want a small, clear sear line on each side, exactly the same thickness. That means very high heat, a short amount of time on each side, and your unmitigated attention while searing. Cooked tuna is white and raw tuna is red, and people that sear tuna at a temperature that’s too low end up with a gradient between the outside (white) and the middle (red). See figure 4 – and note that this idiot has also used a cartilage-filled section of tuna, so the piece is breaking up into strips – for the wrong way and figure 5 for the right way). You want there to be a clear, distinct line between white and red, not a gradient. These are the little details that you don’t fucking notice when you go out to eat, but I do.
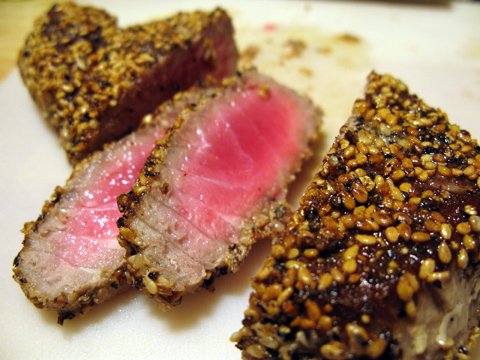
Figure 4 – WRONG!

Figure 5 – RIGHT!
To sear this properly, film the bottom of your pan with the safflower (or another high heat) oil and turn the heat on to high. Let it get screaming hot, then add both of the tapenade-coated logs at the same time. Let them rest without touching them before rotating them 90 degrees. You should do these for about 30 seconds per side – the main thing is that they should be done for exactly the same amount of time on each side, so that the sear looks even when you slice it. The pan will cool ever so slightly when you first add them, so you can add a few seconds before the first flip, but after that, do them for the exact same amount of time. After you’ve finished the fourth side, remove the logs to a platter and place immediately in the fridge, which will help them to stop cooking and will begin to chill them right away.
Now you can turn your attention to the rest of the tuna. If there is a small strip of darker, almost purplish, meat, cut this away and reserve it for another use. (You can actually confit it in the same oil you used for the fennel, at the same temperature and for the same amount of time, and then use it for a salad or pasta.) The technique to remove meat from the cartilage is quite simple, although tedious: using a small, metal spoon, scrape the meat and hold the cartilage. When you get down to smaller pieces of meat clinging to larger pieces of cartilage, you can hold the strip of cartilage on the cutting board with one finger and scrape along its length – the meat will come off with very little effort. It’s much easier to remove the meat in the areas on the outside, since the cartilage here is tougher and easier to hold on to. You could start in that area until you get the hang of it. Once the meat is sitting in a pile to one side of your cutting board and the strips of cartilage are sitting in another pile, go through the cartilage pile to make sure you haven’t missed anything major, then toss them out. Pick through the meat to make sure there are no stray strands of cartilage (you’re not doing this under the gun with 16 other things to do and not enough time to do them, so there’s really no excuse) and then run your knife over the pile to finely mince the whole thing – no large chunks! This is critical to both the taste and the presentation. You need to set this aside and hold it till directly before you plate, since you can’t season the tartare in advance – the lemon juice and salt will change things too drastically and you’ll end up with ceviche.
When you are ready to plate, place the minced tuna in a bowl and add the olive oil, lemon juice, chives, salt and pepper, then stir vigorously a few times to combine evenly. Taste (and revel!) and adjust seasonings.
Here’s a quick tip on chives – finely minced chives are a joy, but if you don’t do them right the effect on both your palate and eyes are ruined. To do this right, you want them to be sliced in rounds that are pretty much 1/64th of an inch thick. I would allow 1/32nd of an inch, but no bigger. And above all, you don’t want a pile of minced chives that are all different sizes. You don’t want them to be bruised or mushed – they should retain their round shape, so it is imperative to use an exceedingly sharp knife. Roll a bunch of chives in a paper towel with a couple inches of chives protruding to out the end, make one slice to even up the ends, then begin making very gentle slices across the bunch. This is painstaking and tedious, but it is not a corner to be cut. Continue to slide about 2 inches at a time out of the end of the paper towel until you come to the tips, which you’ll reserve for another garnish (including on this dish). See figure 6.
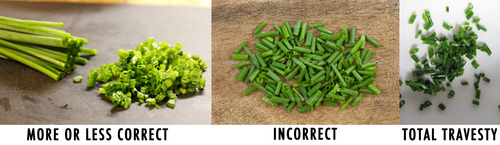
Figure 6
Finally, to the tomato skins – also quite simple. Bring a pot of water to boil, then score a small “x” with a sharp knife in the bottom of the tomatoes. Place them in the boiling water for about 30 seconds, until the skins start to peel back. Remove with a slotted spoon and run under cool water for a few seconds so you can handle them, then slide the skins off in rough strips. Rip the larger pieces into smaller ones, ending up with one piece of skin per assembly. Heat the olive oil in a small sauce pan over medium heat for about 3-4 minutes, then place the skins in (work in batches if necessary) and fry till crispy, about 1 minute. Remove with a slotted spoon and drain on a paper towel, immediately salting them lightly as you do. Reserve until the final plating.
To plate:
Place one piece of fennel confit in the middle of a plate. Slice the log of tuna crosswise in pieces that are about 1/16th of an inch thick, then place them directly on the piece of fennel, fanning them slightly. Using two large silver spoons that are tablespoon-sized, create one large quenelle and place this directly on top of the upper-most slice of seared tuna. Create another quenelle and lean this along side it vertically. (If you’re wondering what a quenelle is, go here.) Balance the strip of fried tomato skin on top so it is sticking up in the air, then cross two chive tips and place them next to the tomato skin, wherever looks good.
Serve immediately and bask in the glory.

Leave a comment